I rarely label myself as a serious climber. Very unlikely I will be able to touch 5.12 any time soon, so why not give it up altogether. There are still a lot of fun in the single digits grades especially for multi-pitches.
This is the last bit of my 2025 Oregon trip. After the wedding, I joined my friends from my graduate school in Smith Rock.
I have to say some thing about Smith Rock… (personal rantings)
I have to say something about Smith Rock. The first time I was there was during the trashed ski trip in 2021. The lesson was to never plan for November skiing in Oregon unless you are a local. Plan B was to drink beers, and Plan C was to spend some time in Smith Rock. So with only harnesses and a belay device, we shamelessly asked strangers if they need us to clean their route. We did got one climb, and I said I have to come back to this.
The second time was with the CMC. These people were beasts. After three days of strenuous day climbs in the Sisters, Jacek and Michael finally called a rest day, and the plan was to go sport climbing in Smith Rock. The July sun was venomous and we got a few top rope laps in the east most part of the park with some shades. I said, yet again, that I have to come back.
And there we go. Finally, I got the right time and right people here. A dedicated trip to find something to climb. I have never seen Emily this insisted and excited about a climb. The original plan was to climb as a group of 4, with the newly married couple. They bailed last minute, and according to them it was a good call. Retrospectively I though they could have given it a try, though.
The approach

From parking lot (red star) there are two ways to climb to the monkey face (black triangle). One is to climb up from the obvious switch back and then down to Monkey Face. This is the shorter and probably faster route with more elevation change. The other one is to circumscribe the rocks along the river. This will be much longer at 3 miles but mostly flat. Just back from some alpine climbs I was most adapted to steep hikes, so I followed the group to do the shorter but steeper approach.
After the top, descend the switch backs and there would be an obvious info board about the monkey face. Follow the slanted trail from the board, and you would find the first bolt of the route.
Route Overview
The route is rated 5.7 C0. Expect a 5.9 variation.
Gear list:
- Standard sport climbing gear (harness, belay and rappel device, helmet, etc.)
- Two 60m ropes if you want the easier and scenic rappel
- A set of cams
- Gears to lead the bolt ladder third pitch. For us, it is: 20 quick draws (I also brought an additional one alpine draw), an adjustable lanyard, and a 60cm nylon sling (as a ladder).
- Gears to follow the aid pitch, we chose to ascend the fixed rope with an improvised ascender, which include a Grigri, a foot sling (60cm nylon sling depending on your height), and a micro-traxion I originally brought for crevasse rescue, and locking carabiners as needed.
- Anchor materials, personal anchors, etc.

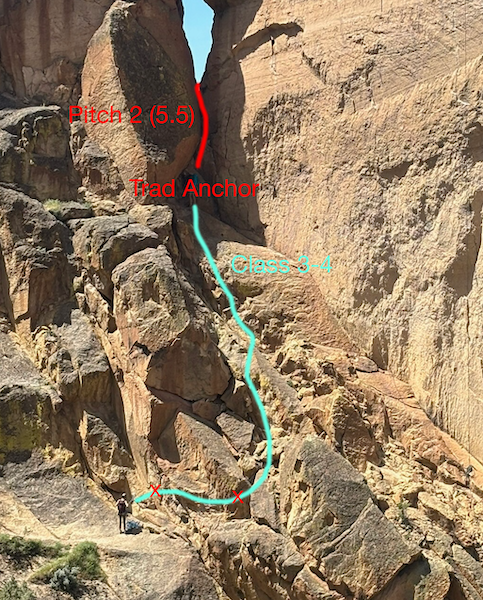
Pitch 1: From a traverse protected by a bolt, scramble some class 4 (actually maybe class 3) to some cracks. Use two cams to build an anchor and bring your follower up.
Pitch 2: A short 5.5 trad pitch. After the saddle point you will need some larger cams like #1-#2. First climb up the cracks to an open, slab face. Bring a few alpine draws as you will need extensions.
Pitch 3: Rated C0 or 5.13d if you free climb. Aid up from a bolt ladder. You will need 20 quickdraws (I think 18 is the minimum if you don’t want to self clean some of the quickdraws on your way up)
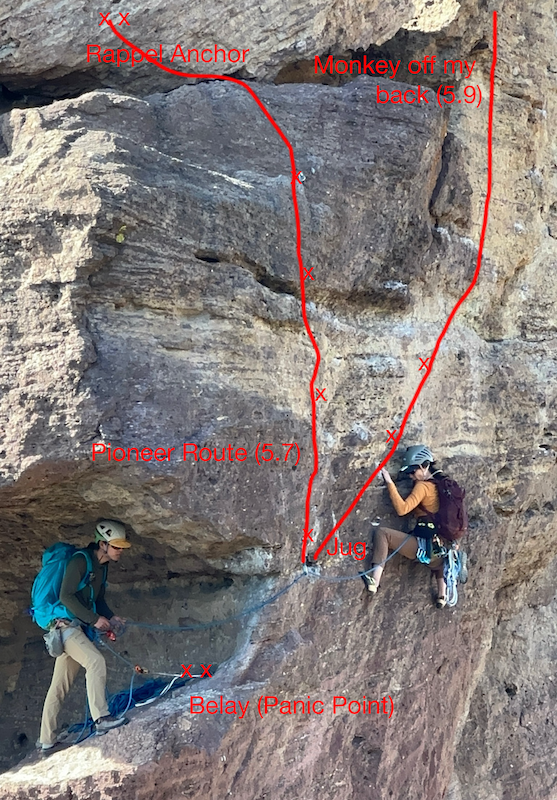
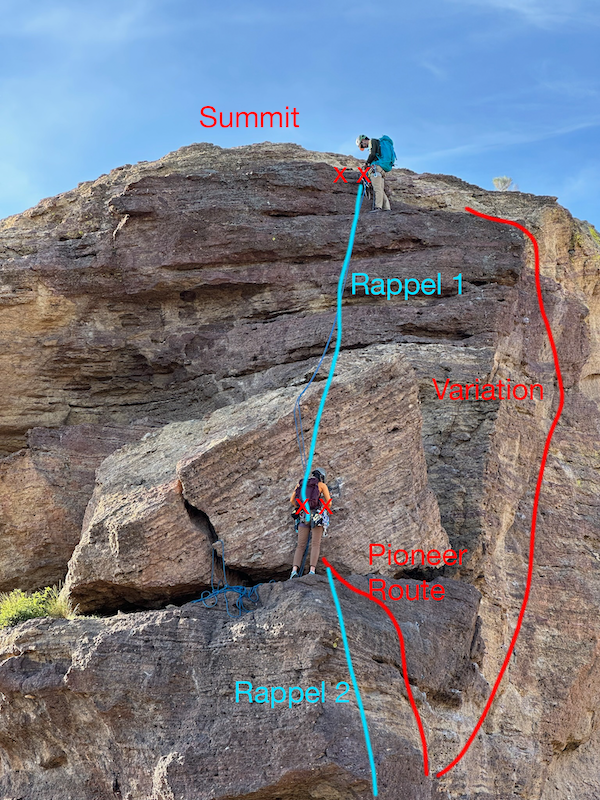
Pitch 4: Either climb a bolted 5.7 straight up to your future rappel anchor, or traverse more to climber’s right to do the 5.9 variation (Monkey off my face). The 5.7 straight up version will require some class 5 scrambling afterwards, but the 5.9 variation will bring you directly up to the highest point protected.
Rappel 1: From the top of the 5.9 variation make a short rappel down to the top of the 5.7 variation.
Rappel 2: Take out your second rope and tie them together. You will need two 60m ropes to finish this. Rappel all the way to the start of the climb (bottom of Pitch 1).
Pitch 1 to 2
Beneath P1 there is a fairly flat place where you can organize everything. Since neither of us had any multipitch experience before, here’s a quote from Emily:
Call out every move and check with each other before executing it. We all know the principles of multipitch climbs. Get tethered to something and sure nothing catastrophic can happen.
We counted gears and were extra careful about partner checks. This included checking the figure eights; we wouldn’t even bother to check in gyms.

I led P1 as I don’t trad but was more comfortable at class 4. The first few moves in the traverse was good (similar to those in Three Fingered Jack) and was protected by a bolt. After that, it was easy and probably less than class 4. I brought all cams with me, and placed one in the middle. It was not necessary and as I forgot to carry up any alpine draw, it created a lot of rope drag. I built a two-piece anchor and belayed Emily up.
She led the second pitch. The cracks were pretty nice (to follow) and after getting up to the face, the view will open up a lot. Now you get a sense how high you are from the other side. I followed in approach shoes but the face climb really scared me. Should have worn rock shoes. The top of P2 has two sets of two-bolt anchors across a walkable ledge. The closer one is right below the top of the next pitch, but the farther one is the start of the bolt ladder. Here’s some considerations:
If we were to bring two more climbers with us…
If we were to bring two more climbers with us, they could stay at the first set of anchors. These two bolts are directly under the top of P3, so they can easily ascend a straight fixed rope as long as the first follower can clean the quickdraws.
Pitch 3
Pitch 3 is the C0 aid pitch. The book said 20 quick draws and we brought a few more. Make sure to include a few alpine draws in it just in case. We’ve never aided before, so we didn’t really know what to expect. Posts from Mountain Projects said “you will figure it out when you get there.” True. As long as we follow some first principles we should be fine.
I didn’t bring any special purpose aid gear like ladders. Just an adjustable lanyard and that’s it. It ended up being a lot of yanking the next quick draw and alternating on rope and PAS. But please do bring some extra 60cm/120cm slings as foot holds. Especially when mantling the edge, you can tie that sling to a quickdraw as an extra foot hold.
Pitch 4

Pitch 4 starts at the Panic Point. You will need to reach out from the monkey mouth to find a jug pretty much invisible at the anchor. Emily was tall enough so she could reach that jug fairly easily. At this point there are two choices, the straight up 5.7 or the traverse-first, longer 5.9 variation. We didn’t really know which was the right way so she went for the 5.9 anyway. This could be the correct call, as the 5.7 classical route will require some unprotected class 5 at the top.
The 5.9 variation requires more draws, so if you followed the guide book (which says 4 draws) and went off route to the variation, you will run out of quick draws very quickly. My climber fell once during the traverse. It was a clean fall for her, but I was yanked and hit the rock to my left. It can be a large fall factor fall (closer to 1), so be sure to communicate well. Honestly, following the traverse was as sketchy as leading it. A fall will result in a fun pendulum and I just asked for takes 🙁 The summit will follow directly after the top anchor with a short stretch of easy class 3.
Rappel

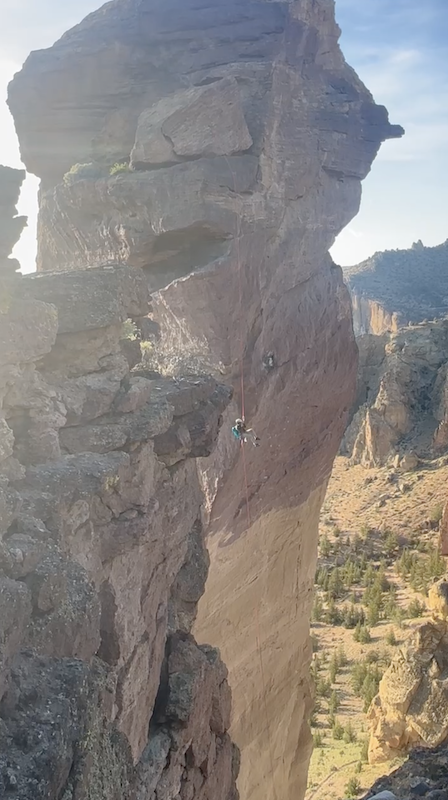
The easiest way to rappel and the way we did it was to use two 60m ropes. First, descend from the top anchor to the lower edge, and from there, tie two topes together and rappel all the way to the start of the route.

This rappel is simply amazing. Soon I left the rock formation and was floating in space. As I descended, the view soon unblocked and the vast canyon floor opened beneath. The Three Sisters and Mt. Jefferson was visible and bathed in golden evening light. Suspended by a rope with nothing but air between me and the ground, that was a surreal sense—weightless, humbled, and fully alive.

Finally, you probably have already noticed that many of these photos are in third person view and they were taken by our friends who decided not to climb it but watch us. They helped a lot with communications (when we couldn’t see each other) and did a superior job of photography.
Leave a Reply